Tuesday, March 3, 2015

BB: Hamantaschen

Hamantaschen--prettier onesI've made hamantaschen a couple of times before this week's The Baking Bible assignment, having learned about the cookie from my Jewish sister-in-law. It's not a style of cookie that particularly appeals to me--I class it with jam thumbprint cookies and the like. This may or may not have anything to do with my struggles to produce acceptable-looking hamantaschen. Alas, Rose's recipe might taste a little better than the others I've attempted, but I still struggled with the shaping and baking.

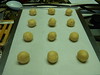
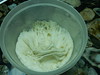
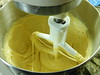
This recipe is a butter cookie made in the food processor. There are the usual amounts of precise details in the recipe, but nonetheless the actual dough is pretty quick to put together. I then skipped the time-consuming step of making a poppyseed filling from scratch (with a side of making apricot levkar to stir into it) in favor of the can of Solo poppyseed filling enhanced with a bit of lemon peel and some apricot jam stirred in. I also made some hamantaschen with just the apricot jam, de-pulped per Rose's instructions for a levkar substitute.

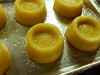
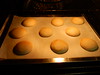
I used a slightly smaller cookie cutter of about 2.5 inches instead of 3, and after overfilling the first batch discovered that a scant teaspoon was plenty of filling--Rose calls for 2 teaspoons for the 3-inch cookie dough rounds. I used the egg glaze to try to glue the cookie sides into the classic tricorne hat shape and chilled the formed cookies before baking, all trying to keep the cookies from unfolding as they bake and letting the filling run out.

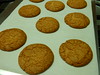
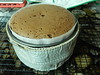
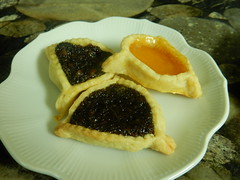
My failure rate was down from my last attempt (with the Smitten Kitchen Cookbook recipe, I think), but that's not saying much. Sister-in-law informs me, now that I'm done with my hamantaschen baking, that folding the sides in to almost completely close is a better strategy. That bit about folding the collapsed sides back up while the cookies are hot from the oven? Not so much. Observe the not-so-pretty cookies:Hamantaschen--not so pretty

In terms of taste, I think the dough is an improvement over my last attempt (though the memory could be off on that). I was a little over-enthusiastic with the lemon peel in the poppyseed filling, but it was in the acceptable range...if you like lemon. The ones where I also stirred in some mini chocolate chips were better, as the chocolate moderated the poppyseed. (And not much isn't improved with a bit of chocolate.) The apricot ones were not successful--I should have used apricot preserves straight from the jar, not the heated-and-sieved version that was a bit too thin to fill these cookies.

So: not really my sort of cookie, and one where I struggle with the baking technique. I sent most of the batch off with sister-in-law for her "Tickling Tech" teachers' session on Friday morning, where the small crowd seemed to appreciate them. The most appreciated cookies of the batch, though, were another step down the line. Sister-in-law passed along the leftovers to another teacher who gave one each to 6 students as a reward for having quietly lined up before class as instructed. Those students ate them slowly and with great enjoyment while the tardy remainder of their classmates watched from the other side of the door, cookie-less. This seems to have greatly enhanced the hamantaschen.

Hamantaschen

Monday, February 23, 2015

BB: Lemon Posset Shortcakes

Lemon Posset ShortcakesI'm conflicted about this week's Alpha Bakers assignment. One thing is clear: the results are a wonderful cakelet--lovely, light, and lemony. My debate is on the process. Really, nothing about this recipe is difficult, or at least not if you can handle a basic sponge cake. (OK, I'd never baked one before the Heavenly Cakes bake-through, but having completed that sponge cakes are about as easy as the butter cakes I grew up with.) However, it's a typical Rose recipe with many steps and precise timing to get exactly the result Rose was striving for, or so I assume. While I enjoy the results, I wish for a less-involved route to get there.

Lemon Posset ShortcakesSo: it's a sponge cake made with browned and clarified butter and baked in individual Maryann pans--that's the "shortcake" style now found at American grocery stores that has a depression on the top for berries. (I'll spare you my rant about the real shortcake for berries being a biscuit, not a cake.) Once the cakelets are baked and cooled, they are brushed with a syrup made with lemon juice. Here the lemon type was unspecified, but as I had an abundance of Meyer lemons for the posset, I used Meyer lemon juice in the syrup as well. Give the syrup a few hours to distribute through the cake, then glaze each cake let with an apple jelly glaze. That's the cake part.

Lemon Posset ShortcakesThe lemon posset is also simple: heavy cream mixed with sweetened Meyer lemon juice and allowed to set. From the recipe I had thought I'd end up with a distinctly layered result, with a thicker top layer, softer middle, and watery bottom. Well, the layers are there but subtle--there's no visual distinction until you start spooning out the posset, and then the texture differences appear. The thicker top layer is spooned onto each cakelet first and allowed to set, preventing the more liquid posset to come from soaking into the cake. Then the less-firm layer is spooned on top and again allowed to set. (The "watery" lowest layer is not used, but makes a great topping for fruit.) Finally, the cakelets are ready to serve. I spooned on a few blueberries for the classic lemon-blueberry flavor combination, and had a very elegant dessert.

No doubt it's a wonderful cake, and I wish the process were less involved--maybe the glaze could be skipped if the cake were made and served on the same day, maybe the time frame for putting the posset on the cakes could be compressed, but any way you look at it this recipe will take some time. I imagine I'll repeat it, but will need a special occasion to justify it.


Lemon Posset ShortcakesLemon Posset ShortcakesLemon Posset ShortcakesLemon Posset ShortcakesLemon Posset Shortcakes

Monday, February 16, 2015

BB: Chocolate Pavarotti with Wicked Good Ganache

Chocolate PavarottiBack to The Baking Bible after 2 weeks away. The schedule worked out well for my planned 10 days at Walt Disney World, as Marie scheduled the apricot-walnut bread I'd baked last Thanksgiving and then a catch-up week, and I've baked everything to date. This week's baking was a little hurried though, as I was rushing to get to younger niece's diving competition.

The Chocolate Pavarotti was a pretty good "rushing" recipe. It's a single-layer chocolate cake with a ganache frosting. The cake includes white chocolate to add moisture and improve the texture, and the ganache has some cayenne (either a mere touch or enough to get some heat) plus a little corn syrup for a shiny finish.

First let me note that the majority of my white chocolate was quite old, and didn't melt very smoothly although the taste seemed fine. If that's an indication the the bar lost some oil during it's time in my pantry (if that's possible without the bar's wrapping showing signs of it), perhaps that explains my cake's rather dry and very crumbly texture. I was careful to cover my boiling water-cocoa mixture to not lose moisture there, and I don't think I over baked it. All my tasters found it too dry, though judicious application of whipped cream seemed to help overcome that.

The ganache was quite nice to my taste. I used the maximum amount of cayenne, and liked the heat+chocolate. The folks next door agreed except for younger niece. Has her 6 months at college affected her tastebuds? :) I delivered 5 pieces for her to share with her diving teammates after the competition finals, and got back a texted comment that the spice was weird. She would prefer the full spice mixture of cinnamon and cayenne we've used in various "Aztec" chocolate recipes instead of just cayenne, and the only reaction I got from a teammate was negative on the heat from the cayenne.

In summary, not really a successful cake, and there's not enough promise here for me to try it again. The ganache was fine and did have a shiny finish to it, but for most occasions I think the classic chocolate and cream, without a separate step of melting unsweetened chocolate in corn syrup, is fine.

The recipe for the Chocolate Pavarotti is available online at the Guittard web site.

Chocolate PavarottiChocolate PavarottiChocolate PavarottiChocolate Pavarotti

Monday, January 26, 2015

BB: Gingersnaps

GingersnapsAh, a selection from the Quick-and-Easy List! After the multi-step panettone, I was ready for this one. If I hadn't gone to the effort of blending light brown sugar and super-fine (caster) sugar to make a substitute for "golden baker's sugar", this would have been really fast. All the dry ingredients including the sugar are mixed in a bowl. The butter, melted with golden syrup, goes in next. Mix that, add an egg and an egg white, and the dough is ready. It gets divided in thirds and chilled a bit, then rolled into 27-gram balls (or go for the 1-1/4" diameter) and baked. The baking sheet gets turned around after 5 minutes for even baking, and at that point the cookies are slightly puffed and smooth, just starting to brown. Five to seven minutes more, and the tops have gone golden brown and cracked. I actually did attempt to use the temperature given to decide when these were done, but trying to put the sensor end of my "instant read" thermometer (it's a fairly slow 7-second version) into a cookie was not successful.

The resulting cookie is nicely gingery, crisp-edged, and chewy in the center. I do tend to like a gingersnap with more bite (my sister-in-law's "Chinese gingersnaps" with lots of grated fresh ginger and white pepper, for example), but this is a very good classic gingersnap.

I took the batch of cookies to a meeting in Denver, transporting them in a ziplock bag. Unfortunately they lost that crisp edge by the time I shared them around on day 3 after baking, and instead of the lovely texture contrast of crisp and chewy, the effect was almost tough--too chewy, if that makes sense. The flavor remained, though, and several folks commented on how well they liked it.
GingersnapsGingersnapsGingersnapsGingersnaps

Monday, January 19, 2015

BB: Golden Orange Panettone with Chocolate Sauce

Golden Orange Panettone with Chocolate SauceI'm sure Rose and Woody read all the Alpha Bakers' posts and think "if these people just did what the recipe said, it would have been fine!" But there's always that difference of wording, and the variations of kitchens, so sometimes things just don't seem to be working out like the recipe says. I had a little of that here, but the results were still just fine.

I've made panettone before when doing the Bread Baker's Apprentice Challenge, with Peter Reinhart's recipe. There are some similarities (beyond, "hey, it's panettone") and some differences, but the overall difference is that Rose's version is a much longer process to build more flavor in the dough. I compressed the schedule a little and used the shorter options in most cases: first because that's just what my schedule demanded, and second because I don't think I'm enough of a super taster to tell the difference between a biga that rested 3 full days vs. my 2-day version. It's just as well: I developed a cold before I got to the tasting part so I was definitely not getting many nuances.
Unstir-able bigaThe biga comes first. Several of us found that our results didn't quite match our expectations based on the recipe wording, which says to "stir" the flour, yeast, and water mixture, and again to stir it down after a first rise. Mine was a dough ball that had to be kneaded to get the flour incorporated, then again could be picked up and kneaded to de-gas it. In my use of the word, I couldn't have stirred it at all, though I might have taken a spatula and folded it over once in the de-gassing stage. Anyway, the biga got made Wednesday evening, rose at room temp overnight, then went in the fridge Thursday morning. I started on the dough Saturday morning to be able to bake it on the weekend.

Next up wasn't the dough, however, but cutting up the fancy candied orange peel into 1/4" bits, and mixing it and some golden raisins with Triple Sec, vanilla, and Fiori di Sicilia. Rose's recipe called for either orange oil or grated orange peel instead of the traditional Fiori di Sicilia, which she finds leaves a bitter aftertaste. I made a stab at finding the orange oil locally but failed, didn't get around to ordering it from Amazon, and didn't feel like grating that orange from the fridge. Out came my Fiori di Sicilia...I don't notice any aftertaste myself.

Very soft dough, after butter additionIn the next stage the biga got cut up, beaten into a sponge (batter), and the dry ingredients for the dough sprinkled on top. That sat at room temp to let the sponge get nice and active, during which it bubbled up in places through the dry ingredients. On to the KitchenAid for mixing with the paddle, not the dough hook, as this is a quite soft dough. Mine was softer than Rose's, I think, unless we have another of those interpretation issues. The recipe said the dough would not completely clean the bowl, and what I pictured based on baking Reinhart's recipes was the type of dough that mostly formed a ball around the dough hook or paddle, but stayed attached at the dimple of the bowl or fully at the bottom. My panettone pretty much stayed coating the sides of the bowl. Lots of nice stretchy strands to indicate that I had some good gluten formation, but not clearing the bowl at all, even after beating in all the butter. I decided it was too wet and added about another 1/4 cup of flour in tablespoon increments, but still didn't have a dough that came off the sides of the bowl. I called enough and let the dough rest before adding in the fruit.

After the rest, the recipe calls for turning out the dough onto a well-floured surface, adding the orange peel and raisins, and kneading those in using as little extra flour as possible. Well, I often (that is, in my weekly challah baking) handle my bread dough on a silicone mat with just a little oil or grease from the rising bowl. I'd already added extra flour to this dough, so I decided to try the no-flour approach. I ran the butter paper over my silicone mat and my hands, then turned out the soft dough from the mixer bowl. It worked just fine, even when the moist fruit got incorporated. I worked pretty quickly so the dough didn't have time to attach too firmly to my hands, and got it kneaded and dumped into a dough container for the first real rise.

The dough rose more than double in 1.5 hours--I should have checked at 1 hour but forgot. It moved to the fridge for 1 hour to let the butter incorporate and firm up, got folded over on itself to de-gas it, refrigerated for another hour, then formed into a ball and put it in a greased gallon bag and in the fridge again for an overnight rest. PanettoneThe next day I shaped the dough into a ball and placed it in a full-sized paper panettone mold. It rose for 3 hours to get the center just over theheight of paper. I snipped the X in the top and got it into the oven.

Panettone crumbBaking was fine, but without any real oven spring as witnessed by my snipped X that looked about like it did going in. I think my paper mold is slightly larger than the recommended size, so perhaps I shouldn't have waited for the bread to rise to the top. The recipe calls for waiting at least 8 hours before cutting, but the cold led to a somewhat overlong 3-day wait before I sliced mine.

What tastebuds I had active during the cold thought it was very nice, with a decided orange flavor even though I'd used Fiori di Sicilia. I'd been wary of the concept of chocolate sauce on sliced bread, but though the textural contrast wasn't a favorite, the chocolate-orange synergy works nonetheless. (The chocolate sauce is a 1:1 dark chocolate ganache.) Sister-in-law took the leftovers to her Friday teachers' session and had one person who strongly disliked the chocolate sauce (a milk chocolate lover, I think), but at least one loved the whole combination. If I repeat this one, I think I'll swap those golden raisins for some chopped dried apricots--raisins just don't add a lot to me.

Unstir-able bigaFilling ingredientsBiga bitsVery soft dough, after butter additionOrangePanettone-risingChilled and rested doughReady to riseRising under a shower capRisen and slashedPanettonePanettone crumb

Sunday, January 11, 2015

BB: Black and Blueberry Pie

Black and Blueberry PiePie. I could dig out the very dated quote from Mrs. Dull's "Southern Cooking" (1928), which was along the lines of "men love pie, and so we womenfolk need to please our men by baking them" but really, I love pie for myself, and don't need any excuse to bake one. This time the pie was younger niece's birthday celebration. It's so nice when the relatives are willing to accept upcoming baking assignments for their celebratory desserts!

The Black and Blueberry Pie the Alpha Bakers are blogging this week is simple and wonderful, and would be even more simple (though not so wonderful, even with my non-expert pastry skills), with a pre-bought pie crust. The recipe uses the same cream-cheese crust as the Luscious Apple Pie which I baked before the group got started. The dough was drier than I remembered in the mixing. I did add a bit more cream to the food processor before dumping the crumbly mix of flour, cream cheese, butter, etc. into a bag. It looked like a mess, but with enough pressing and pushing the crumbs became a mass that could be formed into two lumps for rolling out.

The dough chilled overnight, then the next day I rolled out the bottom crust, got it into the pan, and refrigerated it. I then rolled out the top and cut some berry-ish decorations, then slipped that crust onto a baking sheet and first into the freezer briefly, then the fridge to chill so the design wouldn't stretch when placed on the pie.

Black and Blueberry PieThen it was time for the very easy filling. The dry mixture (sugar and cornstarch, mostly) goes in a bowl, add lemon zest and juice are added to get a slurry. Dump in frozen blackberries and blueberries, stir, and turn the entire mix into the prepared crust. (Fresh berries are fine too, but it's winter in the northern hemisphere. Not getting good fresh berries right now...) On goes the top crust, after moistening the edge for a good seal. I had to let my top crust warm a bit before it could be tucked under and then crimped into a decorative edge. The pie then goes back to the fridge for another chill before baking.

Black and Blueberry PieThe pie bakes on a stone at the bottom of the oven, with a edge protector. Rose calls for a foil ring, but I used a silicone protector which I'd used on the apple pie as well as other recipes. However, when my pie was done my decorative crimped edge emerged from under the shield pretty much flat. It was also a little too brown, which is somewhat contradictory--if the silicone was too good an insulator and kept the heat from setting the crimped edge before it semi-melted, you'd have thought it would have kept things from getting too brown. But maybe not....Rose thought the silicone ring was the likely culprit, anyway. It caused some problems with the apple pie too, so I guess it needs to be chalked up as an unsuccessful experiment. Or maybe I can put it on after the pastry has set but before it started to really brown.

Black and Blueberry PieFlattened edge or no, the pie was a big hit, even with all the chocoholics next door. I served it with some barely sweetened whipped cream which gave just the right accent to the sweet berries and pastry. A la mode, with the pie warmed a bit, would also do well, but the birthday girl opted for whipped cream.

Black and Blueberry PieBlack and Blueberry PieBlack and Blueberry Pie

Sunday, January 4, 2015

BB: Chocolate Cuddle Cake

Chocolate Cuddle Cake

As I had already baked the frozen pecan tart that was the assignment for Christmas week, I looked ahead for a dessert for our Christmas dinner and landed on the Chocolate Cuddle Cake. It's just me and the folks next door for the meal, so I went with a half-sized cake. Unfortunately that doesn't reduce the amount of pans and utensils needed. :) Equipment for Choc Cuddle Cake (That's two bowls and whisks for the KitchenAid mixer, plus the Cuisinart food processor with metal blade, plus the hand mixer, plus the baking pan and another mixing bowl. This doesn't include pans and bowls for the caramel, and assorted other stuff.)


I used a 6" springform pan, not quite 3" tall. I didn't measure my parchment paper strips used to line the pan to get them 3" high, having not thought this all through, and regretted it. This is a genoise, so needs to be turned upside down to cool so that it doesn't collapse. I had to do a little hasty trimming right after taking the cake from the oven, but it all worked out. Chocolate Cuddle Cake

I don't have any notes on the cake besides the egg yolks and whites measuring as desired,not always the case with the variation in egg sizes: 2 yolks were just about the desired amount, and 2 whites a little over (which is fine--they are used to make a meringue which is folded in to the chocolate mixture). I had mixed success at getting the parchments strips off the cooled cake after holding a hot damp towel to them--about half of them came away clean leaving a smooth cake surface, and the rest stuck a bit to leave a rough surface. The cake gets covered with ganache though, so the mix of surfaces was quickly hidden.

Chocolate Cuddle Cake The ganache was straightforward using the food processor. I frosted the sides, followed the shape of the cake which curved in at the top where the cake pulled away from the top of the pan. I decided to follow the suggestion of using a pastry bag to pipe an edging at the top edge to hold in the whipped cream topping, but didn't stop to practice for the half-shells Rose used. Instead I started with a set of small swirls in several shapes, then a round of stars as there was still ganache left. I got the cake to this point on Christmas Eve, and left it in a large sealed container at room temperature overnight.

Christmas morning, after the presents were opened and while the prime rib was roasting, I started the caramel whipped cream. It's actually chocolate caramel whipped cream, to add to the decadence level. First comes caramel--sugar, a bit of golden syrup to keep it from crystalizing, and a bit of water to start. I chickened out (well, didn't quite trust this thermometer, which I hadn't used for candy before) and stopped a bit below the target temperature, but I still had a golden caramel after the cream and butter had been stirred in. For the chocolate, 2 teaspoons of cocoa get whisked into a little hot cream, then that all gets mixed into the caramel. I didn't whisk vigorously enough and later had a few spots of cocoa in my chocolate whipped cream....somehow, no one complained. The final steps were to whip more cream to soft peaks, then whip in the chocolate caramel mixture, then finally some gelatin softened in even more cream to stabilize the whole thing. I had managed the softening of the gelatin and getting it melted, but somewhere in cooing process or in adding the vanilla to it the gelatin clumped up. A few seconds in the microwave and some stirring got it back to liquid, and it whipped into the rest of the cream with no problems.

Even though the cake was half-sized I made a full recipe of the caramel whipped cream--halving the small caramel recipe would have been pretty difficult. Perhaps because of my curved-in top, I only managed to pile about a quarter (maybe a third) of the recipe on the cake, so we passed some around to dollop beside the cake slices. No complaints there. I also tackled chocolate curls with mixed success, using Rose's technique for getting the right sized bar (my silicone financier pan was about right) and then finding the right temperature for the chocolate to curl. After a lot of splinters I did get a few curls, but the chocolate was blotchy, I think because I may have stirred in some air bubbles while making my chocolate bar. Cosmetic issues only...and again, no complaints.

The half cake was a good decision as it made 6 nice-sized pieces for us. The cake was moist and even textured, the ganache added extra chocolate intensity, and the caramel whipped cream balanced the "total chocolate" effect nicely. Would I make it again? Probably not--it was a good bit of effort, and all three components (cake, ganache, whipped cream) are needed to get the well-designed cake. Sister-in-law asked if I might do just the whipped cream again and I said no. I'll hedge on that now and say maybe. For a special occasion, when I'm not juggling several other cooking tasks too. Maybe. :)

P.S. on the caramel whipped cream: the leftovers went along as the folks next door left town to visit relatives. I understand some was eaten on the plane with fruit, and the rest was finished up at their destination. Don't let it be said that any caramel whipped cream went to waste around here!

Chocolate Cuddle CakeChocolate Cuddle CakeChocolate Cuddle CakeChocolate Cuddle Cake