Sunday, March 20, 2016

BB: Babka with Chocolate-Almond Schmear

Babka with Chocolate Almond SchmearMy babka, the weekly Rose's Alpha Bakers recipe, shows both how distracted I am and that you can get away with a good bit of sloppiness and still have a wonderful bread at the end. I set out to bake a half recipe of the babka using the chocolate almond schmear filling. While both the almond and the apricot and cream cheese fillings sounded good, I went with the chocolate because, well, chocolate. Also no cream cheese in the house and not wanting to make a grocery store run.

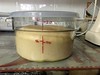
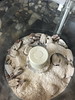
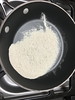
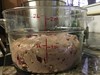
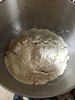
The bread began, as usual, with a spong. I keep King Arthur bread flour instead of Rose's preferred Gold Medal, but I didn't want to haul down the second flour container and work out the weights for a half-recipe to get just the right protein level blending KA all-purpose and bread flours, and so used all KA bread flour. From Rose's note, I'll have a denser crumb and more browning as a result. The sponge got a bout 2 hours of rising time at room temperature (because I got absorbed on the computer and forgot it), then went into the fridge overnight to build flavor. Mixing the actual dough was a snap in the stand mixer...except I discovered as I set it to rise that I'd omitted the vanilla. I spread the dough out on a pastry mat and kneaded the vanilla in, mostly. The somewhat uneven areas after this activity seemed to disappear in the first rise.

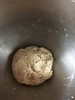
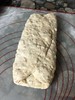
Then the recipe calls for deflating the dough and chilling it so it can be rolled out and shaped. I distractedly assumed there was a second rise before the shaping and gave it one, stretching out the process as the chilling step can't be skipped: the dough is too soft and sticky otherwise.

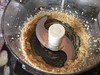
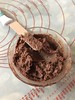
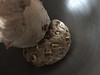
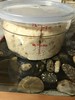
While the mistaken second rise was on, I made the filling. The chocolate-almond schmear calls for cake crumbs as a primary component. I normally wouldn't have cake or cake crumbs around, though this time I did (or I could have reclaimed the leftovers from next door). However, that cake is a sort-of spice cake flavored with nutmeg and cinnamon. I didn't want nutmeg in my chocolate schmear (though the dark chocolate might have hidden it) so dragged an end of challah from the freezer and made crumbs with that. I figured generic "cake" would have been higher fat and certainly higher sugar than the challah, and of course wouldn't have yeast, but that the real purpose of these crumbs is a carrier for the chocolate and almond paste. I'm sure less sweet would be fine for all of us, and with the butter in the schmear I didn't think the lower fat level will matter either.

Babka
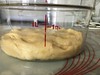
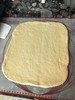
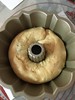
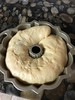
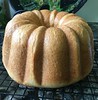
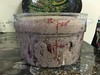
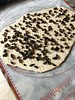
Schmear waiting, it was time to roll out the dough. I skipped flouring the surface and rolled directly on a silicon mat, letting the residual Pam from the rising container give a bit of non-stick help. I couldn't really interpret the proportions instructions in order to work out which direction to halve, so I winged it and made a rough rectangle, spread on the chocolate (couldn't work out which end to leave a wider margin, either), and rolled it up, pressing as I went to try to keep the bread from opening gaps around the filling. I recently bought a 6-cup Bundt pan precisely for doing half recipes, and the roll of babka dough fit in it nicely though without much overlap...guess my rough rectangle should have been a bit wider.

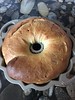
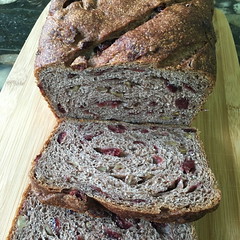
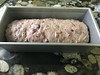
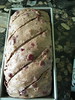
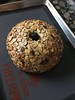
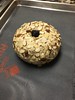
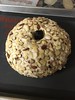
It baked just in 40 minutes, rotated in the oven after 25, got nicely brown on top (I covered it loosely with foil after the first 25 minutes) though maybe a bit light on the bottom. The warm bread got brushed with melted butter (which Rose calls a "butter glaze") to soften the crust.

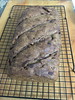
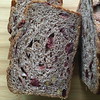
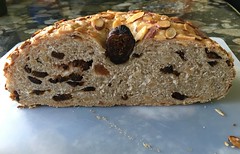
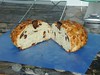
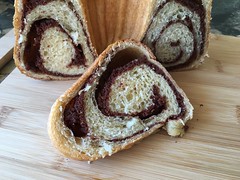
Result: nice light crumb, good chocolate flavor on the filling, for a winner of a bread. I did have gaps around the filling, so I guess my rolling-and-pressing technique needs some work. The filling also has a tendency to fall out in moist crumbs as you slice the bread and my limited babka experience doesn't tell me if this is typical. The crumbs become an treat for the one doing the slicing....

Babka Babka Babka Babka Babka Babka Babka Babka Babka Babka

Monday, March 7, 2016

BB: Coconut Cupcakes with Milk Chocolate Ganache

Coconut Cupcakes with Milk Chocolate GanacheA blast-from-the-past recipe this week for Rose's Alpha Bakers, at least those who were also in the Heavenly Bakers group: this week's Coconut Cupcakes are a re-configured cupcake version of the "Southern (Manhattan) Coconut Cake" from Rose's Heavenly Cakes. As it happens, I had baked the RHC version as cupcakes. I seem to be shrinking things even further, as I did this week's recipe as mini cupcakes.

This coconut cake is a white cake made with coconut milk and flavored with coconut extract (I had an oil-based "coconut flavor"). I halved the recipe and got 23 mini cupcakes from the batch. With the small amounts of various ingredients to work with, I dug out a hand-held mixer for the job and the cake batter came together very quickly.

For the frosting, I went with the "Custom Rose Blend Milk Chocolate Ganache" instead of the multi-stage buttercream (been there, done that, not really my thing...). The custom blend ganache takes white chocolate, dark chocolate, and cream to make a ganache, instead of just a chocolate of the desired level plus cream. I chopped my chocolate by hand and poured the hot cream over it instead of using a food processor, again feeling that the smaller amount of ingredients didn't warrant the full sized appliance. Needing to rush the cooling by sticking it in the fridge (more week night baking), I overshot a bit and lost the nice shiny finish to the ganache, but the texture was still smooth enough in the end.

A couple of the cupcakes got eaten plain (ahem) and I enjoyed the delicate coconut flavor. With the ganache applied plus some (labor saving) Trader Joe's toasted coconut chips for decor, the dominant flavor is the chocolate--which is nice, but a balance with the coconut would have been better. I think full-sized cupcakes, not overly plied with ganache, might have balanced the components better.

Coconut Cupcakes with Milk Chocolate Ganache Coconut Cupcakes with Milk Chocolate Ganache Coconut Cupcakes with Milk Chocolate Ganache

Sunday, March 6, 2016

BB: Cranberry Walnut Christmas Bread, but Pecan

Cranberry Pecan Christmas BreadHere's a very belated writeup of baking the Cranberry Walnut Christmas Bread from Beranbaum's The Baking Bible, which was on the group's baking list for (surprise) the week of Christmas. I subbed toasted pecans from a local not-really-a-farmer's-market place, saving both the toasting step and the rubbing of walnut skins...and I like pecans better. I grabbed an opaque bag of store brand cranberries which turned out to be chopped cranberries and not the whole ones called for.

This bread starts out with a biga, with a recommendation that it get 3 days to develop the best flavor. Mine rested overnight--better than the 6-hour minimum, anyway. Meanwhile the cranberries got a soak to soften them, then were drained and the soaking liquid became the liquid for the bread dough.

I used my KitchenAid mixer for the dough, as I do with almost all breads these days. The biga was cut into pieces into the cranberry water, then in goes the flour and other dry ingredients, including some diastatic malt powder that I'd cooked into non-diastatic state per Internet instructions. It got an autolyse pause then machine kneading, then in went the oil and the chopped nuts...gosh, that's a lot of nuts. It took a long time to get most of the nuts incorporated, and there were periodic escapees from the dough. Next was to add the soaked cranberry fragments--in the mixer for me, hoping it wouldn't stain the dough too much...but then with the fruit already cut, that was pretty much of a lost cause. I let the mixer go a bit longer to get the cranberries fairly distributed. If I'd thought this dough had a lot of mix-ins before, I was wrong.

Once I had the dough completed, brimming with all its nuts and fruit, I dumped it into greased bowl, pulled it back out to shape a bit, and let it rise twice. On shaping after the second rise, I moved all the pecans that were very close to the top and tucked them into better covered locations, trying to avoid burned pecans. The recipe called for a torpedo shape, but I opted for using my big loaf pan...which might be a touch too big, as I'd have preferred a slightly taller loaf. The dough rose well, was slashed with lame, spritzed with water, and baked using the ice cubes in a hot pan to add steam. Despite being pretty careful to not overproof, I still didn't get much oven spring.

Results: Excellent bread. This was a hit with everyone, even those not all that fond of cranberries. (Maybe the smaller cranberry pieces helped there.) It's got a nice chewy texture, and as noted above, a high ratio of "good stuff" to bread. I'm planning on baking this one again.

Cranberry Pecan Christmas Bread Cranberry Pecan Christmas Bread Cranberry Pecan Christmas Bread Cranberry Pecan Christmas Bread Cranberry Pecan Christmas Bread Cranberry Pecan Christmas Bread Cranberry Pecan Christmas Bread Cranberry Pecan Christmas Bread Cranberry Pecan Christmas Bread Cranberry Pecan Christmas Bread Cranberry Pecan Christmas Bread Cranberry Pecan Christmas Bread Cranberry Pecan Christmas Bread

The Bread Bible: Pretzel Bread

Pretzel BreadPretzel Rolls, really. Cute, little pretzel rolls, about 4 inches long, a good size for nibbling. The goal of this Bread Bible recipe is the authentic soft-pretzel taste and appearance, though not the shape.

This is a fairly small dough recipe, maybe because the edible half-life of an uneaten soft pretzel is quite short. The recipe uses bread flour with a few tablespoons of whole wheat thrown in as many of The Bread Bible recipes do. I did add the optional malt powder--diastolic, as it turns out, as the recipe didn't specify and that's what was open. (I now have found Rose's note in the back saying that she uses non-diastolic because her flour is malted...oh well. At this amount, I don't think it matters much.)

The dough mixture was quite dry, so I added a teaspoon or so of water early in the kneading to get everything moist. Then after a generous 7 minutes of kneading, I had several pieces of very stiff dough--it had been one ball for a while, but then separated and wasn't moist enough to come back together. At that point I added another half-teaspoon of water and gave it another 3 or 4 minutes of kneading. I wouldn't call the result a smooth ball of dough, but at least it was one piece. Also still very stiff, as the recipe indicated it would be.

Pretzel Bread I divided my ball of dough into 12 pieces of 33 grams each, which was much smaller than the size the recipe indicated of 3.5 inches by 2.5 inches high. These were to be shaped into flattened balls for the first rest and rise. Mine ended up as flattened dough circles of about 2.5 inches diameter, and maybe 1/3 inch high. I see from notes in the bake-along Facebook group that the size guidelines seem to have been dropped from a later edition of the book, perhaps to correct this. I'm beginning to think I should sell my copy and buy a new one (probably an ebook, at this point, as I think I've got plenty of general bread books around now)--the revisions between the editions clearly go beyond the errata that I've already marked in my copy.

Pretzel BreadAfter the first rise, the dough pieces of whatever shape get formed into vaguely football (American, that is) shapes and get a second brief rise, then are refrigerated to firm them up for the dipping-in-lye process that produces the classic pretzel crust. I did procure food-grade lye and very cautiously used it for my dipping solution, and indeed got the pretzel-brown finish I wanted. In one change from the recipe, I dipped my rolls first, then slashed them, so I would get the color contrast on the finished rolls.

IMG_4099Results: the appearance was great--very pretzel-ly. I'm not a huge soft pretzel fan so my personal tasting comment is "it's a soft pretzel", and all other tasters got these the next day when the salt had melted with storage and the rolls were beginning to stale. Didn't stop them from getting eaten, though!

Saturday, March 5, 2016

The Bread Bible: New Zealand Almond and Fig Bread

NZ Almond and Fig BreadI first baked this bread in 2007, according to a note I left in my copy of The Bread Bible, attracted by the photo--The Bread Bible is of the era where there are fewer (costly) photos, bound in groups between the signatures of non-glossy recipe pages. The bread didn't make a strong impression besides the caution (also in that note) that the apricot jam glaze softened the covering of sliced almonds into slightly soggy flakes.
However, it's this month's choice for the Bread Bible Alpha Bakers and I had almonds and figs on hand, so I gave it another try. The base technique is familiar: make a sponge of bread flour, water and yeast, mix all the remaining ingredients (more bread flour, more yeast, whole-wheat flour), and sprinkle on the sponge. Let that sit at room temperature for an hour, then move it to the fridge for up to 24 hours. A bit of oil goes in, then I used the KitchenAid to bash it into a dough. The resulting mass was quite dry, perhaps as the temperature has gotten chilly again so the heat is on to dehydrate the house. The rough dough gets to rest and relax for 20 minutes (and hydrate), then the salt goes in before the real kneading. While waiting, I lightly toasted some slivered almonds (blanched, and from my freezer stash which accounts for the pre-toasting) and roughly chopped them, then sliced and diced the Mission figs into fairly small bits. I also added my chopped almonds with the salt, to let the mixer help get those integrated. Not the figs, though, as I think they would have been bashed into a paste to make a fig-dough. The dough was still quite dry even after the hydration rest, so I also began spritzing on water as it kneaded. In the end I had a somewhat tacky (as called for), very stiff dough. This I rolled out on a floured silicon mat to a rough rectangle, sprinkled on my fig bits, rolled it up, coiled it, and sort of smoothed that into a ball without kneading it.
NZ Almond and Fig BreadThis recipe was not a good choice for the weeknight when I baked it, as now it needed 3 rises. I sped these up a bit by using my warming drawer with the heat a bit above the usual proof setting, but still...three rises. After the first the dough got 2 letter-folds, then after the second it was shaped into a ball (the stiff dough still fighting this), spritzed with water, and rolled in sliced almonds. The round loaf then went onto a SilPain mat for its last rise before baking. After the last rise I spritzed a bit more water on the barest spots where the initial almond coating had been spread by the rising dough, and stuck on more sliced almonds. Then, remembering that I didn't like the jam glaze on my previous attempt at this bread, I made an egg wash and carefully brushed that on the bread and almonds before sliding it into the oven. That egg wash was probably was the major factor in needing to cover it with foil only 10 minutes into the bake, but in the end the almonds were well browned but not burned.
The result is a beautiful load with the almond coating and a whole fig stuck in the middle. It's a nice chewy white loaf (I don't detect much from the whole-wheat flour), with a bit of crunch from the interior and exterior almonds and a bit of sweetness from the fig bits. I've had it plain and toasted, and may try making a grilled cheese sandwich with it too. Not a stellar bread in terms of taste for me, but a very pretty effect.

New Zealand Fig and Almond Bread, 2007The 2007 version, shinier
with its apricot glaze.


NZ Almond and Fig Bread NZ Almond and Fig Bread NZ Almond and Fig Bread NZ Almond and Fig Bread NZ Almond and Fig Bread NZ Almond and Fig Bread NZ Almond and Fig Bread